First-hand · one self-managed build
Managing your own house build in Mexico: 10 things I wish I’d known
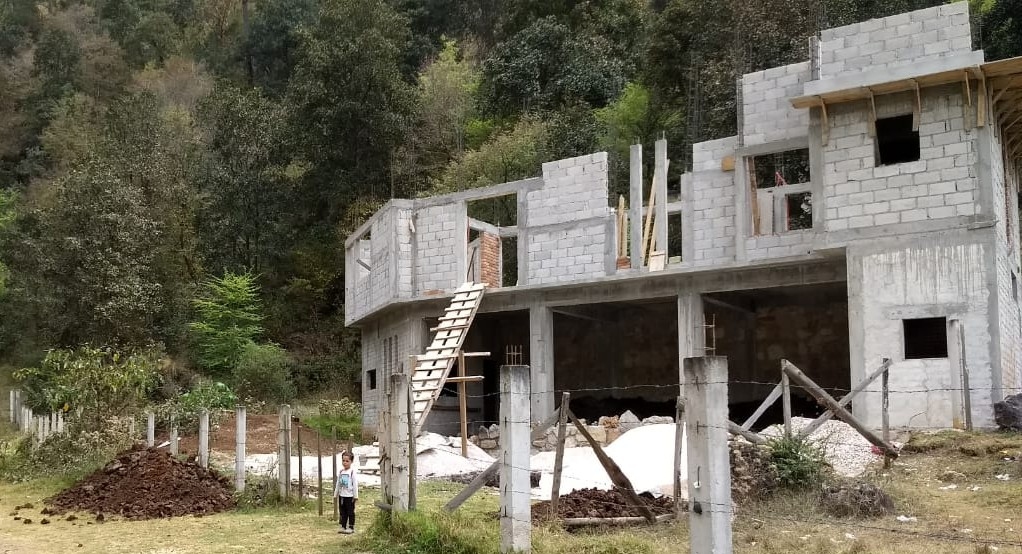
I managed the construction of my own house in San Cristóbal de las Casas, Chiapas — finding materials, coordinating masons, catching mistakes and making decisions, while working full time. This isn’t a generic construction guide. It’s the practical site knowledge I only picked up because I was the person who had to order the sand, check the cement, question the finish, and keep the job moving.
En español: Cómo gestionar la construcción de tu casa en México →
From my build · the shell going up
The short version
Managing your own build can save real money — but the saving isn’t free. You pay for it with attention. You become the person responsible for materials, timing, quality checks and daily decisions — the jobs a contractor or maestro de obra would otherwise carry for you. Self-managing doesn’t mean doing all the labour yourself. It means being close enough to the work to stop small problems becoming expensive ones. These are the ten lessons that cost me time and money to learn.
First, the basics
What does managing your own build actually mean?
When I say I managed my own build, I don’t mean I laid every block or poured every losa myself. I hired masons and paid skilled workers for the things they knew how to do. The difference was that I didn’t hand the whole project to an architect, contractor or maestro de obra and wait for a finished house.
I was the person ordering materials, checking what had run out, comparing prices, asking why something was being done a certain way, and deciding what could wait until later. That gave me more control over the budget — but it also meant the delays and mistakes were mine to catch.
This article is about that middle ground: not doing everything yourself, but not disappearing from the build either.
At a glance
The ten lessons, and why each one matters
Each lesson is a thing I got wrong, learned late, or only understood after I’d already paid for it. The deeper technical and cost detail lives on the linked pages.
The ten lessons, at a glance
| Lesson | Why it matters to you as the manager | Go deeper |
|---|---|---|
| 1. Own your materials supply | Builders’ prices for sand, gravel and cement can run 15% higher than your own contact — on the biggest-volume materials in the build. | Cost breakdown |
| 2. Plan extensions before the concrete is poured | Leaving protruding rebar now is free; retrofitting later can mean weaker joins and damp problems. | Roof choices |
| 3. Pin down the rendering standard | It quietly decides labour cost, material use and whether your walls are straight — and whether the render is still on in two years. | — |
| 4. Don’t let recycled nails slow the job | Paying labour to straighten old nails costs more than the nails. | — |
| 5. Store cement properly in the rainy season | Bulk cement ruined by damp is money poured away. | — |
| 6. Hand-poured slab vs mixer-and-crane | Roughly the same price; very different on speed, mess and confidence. | Roof choices |
| 7. Have plastic sheets ready before the pour | A slab that dries too fast in the sun cracks — and you can’t go back. | — |
| 8. Learn the thermofusor | A MX$400 tool lets you finish your own plumbing — the lowest-barrier building skill there is. | Water system |
| 9. Render the exterior as part of the build | Doing it years later means cleaning cement off finished doors, windows and paths. | Cost breakdown |
| 10. Choose wall materials for how they live | Comfort you feel every morning and night — not just the price on the quote. | Wall materials |
Lesson 01
Own your materials supply — and count it every afternoon
On my build, the supplier contact alone moved the price by around 15% on some of the highest-volume materials.
Sand and gravel are bought by the camionada — the truckload. My first assigned builder asked whether I’d handle ordering them. I had no idea who to call, so we agreed he would. Two things became clear later. When I switched builders, I found the price for these materials could move by around 15% depending on whose contact you used — a substantial amount on some of the highest-volume materials in the whole build. And having my own supplier the second time around was quietly empowering: it shows a builder you know what you’re doing, which sets the right boss-and-contractor tone from day one. I’ve since had builders ask me for my contact when I tell them the price I pay.
Smaller, non-chain ferreterías sometimes grow into sizeable local cement distributors, and in my experience they’re cheaper than the big chains — though they often take longer to deliver. Buy cement by the ton, and rebar in volume, and you save on both.
The other half of this lesson is the one I’d repeat loudest: check your sand, gravel and cement on site at the end of every day. If you’re managing the build, the masons won’t be tracking stock for you — they’ll tell you they’ve run out only once they have, with the work already stopped and people standing around. Order at least a day ahead; order in the early afternoon for the best chance of delivery before midday the next day. When the columns and beams are going up, the same applies to alambrón, alambre and nails.
Why this is lesson one
Running out of material is the most common way a self-managed build loses days — and idle workers you’re paying by the week. The fix costs nothing but a five-minute walk-round each afternoon and one phone call.
Lesson 02
Plan future extensions before the concrete is poured
The cheapest time to plan an extension is before the first roof is even poured — and it’s free.
I built my house in two stages, so I’ve had to add onto existing concrete. Two things are worth knowing before you’re in that position. First, if you tie a new horizontal reinforced-concrete beam into an existing column, it’s a weak connection. Some masons refuse to do it; others do it without a second thought. Don’t take either at face value — ask a structural engineer.
Second, if you already know you’ll extend a concrete roof later, ask the masons to leave a good length of rebar protruding from the reinforced beam, perpendicular and ready, so the new roof can be structurally joined. It costs nothing now and is almost impossible to replicate later.
The caveat I learned the hard way
In my experience, joining a new concrete slab roof to an existing one tends to let water and humidity filter through the join, however carefully it’s done. I’m running tiles over the full length of where my two roofs meet to keep the damp out of the house. Plan for the join to be a weak point, and detail it accordingly.
If you’re weighing a concrete roof against the alternative for exactly these reasons, I wrote up the full comparison separately.
Lesson 03
Pin down the rendering standard before you accept the quote
“Rendered” can mean two very different walls — and the cheaper one isn’t straight.
I had two clearly different standards of rendering on my house from different builders. In the first, the render is brought plumb and a builder’s line is used meticulously, so the finished wall is genuinely straight and level across its whole length. In the second, no consistent flat surface is achieved across the wall. The second is faster, easier and uses less material — especially where the wall isn’t plumb, because the builder isn’t compensating with extra cement. Both get called “rendering.” Always ask which one you’re quoting, or which one you’re getting — it has a big effect on labour and on how the finished house looks.
There’s a second conversation to force, and it’s about adhesion. Render doesn’t stick well to smooth concrete, and columns and beams are usually smooth. In Guatemala, masons routinely chisel small indents into those surfaces so the render grips. In Chiapas, in my experience, this gets skipped or done half-heartedly. Make it an explicit talking point: “How are you making sure the render doesn’t fall off in a year or two?”
Lesson 04
Don’t let recycled nails slow the job down
Recycling is good — except for nails on an active site.
I’m all for recycling, and I’d never argue against it generally. But every mason I’ve hired will stop and hammer old nails out of scrap wood and straighten them for the next stage rather than ask for new ones. That’s labour I’m paying for, to save the cost of nails that are cheap to begin with. Buy the nails. The old ones can still be recycled after the project — when they’re not holding up your build.
Lesson 05
Store cement properly in the rainy season
Bulk cement is a saving — until the damp gets into it.
If you’ve bought cement in bulk to save money, protect it, especially in the rainy season. Keep it off the ground, keep it under a roof, and wrap it in plastic — particularly if it might be a couple of weeks before you use it all. Damp cement is money you’ve already poured away. (This is one of several reasons to have plastic sheeting on site before you need it — see lesson 7.)
Lesson 06
Hand-poured slab vs mixer-and-crane: why I switched
Most roofs in Chiapas are poured by hand — the slab, or losa as it’s called on site. I had my intermediate floor poured by workers carrying buckets. When I added rooms onto the back of the house later, I paid for a concrete mixer truck with a pump on an extendable crane instead. Here’s why.
I expected price to be the deciding factor — it wasn’t. I costed both options and they came within 6% of each other (and even that’s fuzzy, because a manual pour can leave you with leftover concrete mix). On cost, call it a wash. The real differences were everywhere else:
Hand-poured slab vs mixer & crane
| Factor | Winner | What I saw |
|---|---|---|
| Speed | Mixer & crane | About 45 minutes, versus roughly 3 hours by hand (depends on roof size). |
| Mess & labour | Mixer & crane | A hand pour means 15–20 labourers tramping round the wet site — whom you then feed — and a clean-up the next day. |
| Platform strength | Hand pour | The crane drops cement from a height, so your timber shuttering has to be built stronger for it. |
| Mix confidence | Mixer & crane | By hand, with many people mixing, proportions vary and mud gets walked into the mix in the wet season. I trusted the mixer more. |
An honest disclaimer
Which of my slabs cracked? The one poured by the mixer. But I doubt the mix was to blame — far more likely a movement in the supporting structure and the intense sun straight after the pour (see lesson 7). I still chose the mixer the second time, and would again.
Lesson 07
Have plastic sheets ready before you pour
A slab cures by staying wet. In direct sun, it can’t — unless you’ve planned for it.
If you pour a losa — the concrete slab, and you may end up doing parts of it yourself — cover it, especially if the roof or floor sits in direct sun all day. One thing they do in Guatemala that I’ve not seen in Mexico is build a temporary cement lip around the roof edge at the pour, to pond water on top and keep the slab humid while it cures. My roof was fully exposed, and despite trying to keep it wet, that’s nearly impossible without something to trap the water. A plastic sheet both shades the slab from the worst of the sun and helps hold the moisture in. I wish I’d done it.
When you’re not curing a slab, those same sheets earn their keep: strapping over your stored cement bags (lesson 5), and protecting anything you don’t want cement on — brick, stonework, finished pavers — while rendering.
Lesson 08
Learn one simple skill: the thermofusor
For about MX$400, you can do your own plumbing joins. There’s no lower-barrier building skill.
You can buy a Chinese thermofusor on Amazon — like I did — for around MX$400, and it works perfectly. There is no cheaper, lower-training-barrier house-building and maintenance skill than fusing together ½” water pipe. YouTube covers the few basic steps, you can practise for almost nothing, and at a minimum it lets you finish off the bathroom and kitchen connections yourself when you’re fitting the sinks and toilets.
Lesson 09
Render the exterior as part of the build, not years later
Rendering is a filthy job. Do it before there’s anything finished to ruin.
I had the outside of my house rendered two years after the build was otherwise done, because I didn’t have the budget for it at the time. I don’t regret waiting — but it’s not a good experience. Render is messy work, with wet cement flying everywhere; even the cat keeps away while the builders are at it. Doing it late meant cleaning cement off finished doors and windows, and fretting over footprints and splatter on the new garden-path pavers. If you can possibly afford to render the exterior while the build is still rough, do — your doors, windows, paths and driveway will all thank you for it.
Lesson 10
Choose wall materials for how they live, not just what they cost
Wall materials are not just a price decision. On my build, I used different materials in different parts of the same house — brick, hollow cement block, tabicón and a lightweight pómez thermal block — and they did not feel the same once I was living with them.
The biggest lesson was that a wall’s sun exposure matters as much as the unit price. A material that makes sense on a sunny wall may not be the right choice for a shaded bedroom wall that stays cold all winter. I wish I had planned the wall materials room by room before the build reached that stage.
For the full comparison — cost, comfort, render choice, weight and where I’d use each material again — see brick vs block vs thermal block in Mexico.
Keep this
The end-of-day site checklist
The single habit that prevented the most lost days. Walk the site each afternoon and check you have enough of these for tomorrow — and order by early afternoon if you don’t.
- Sand & gravel — by the truckload; your own contact, not the builder’s
- Cement — and that it’s stored off the ground, under cover, wrapped
- Rebar — and, while pouring columns/beams, alambrón and alambre
- Lime — for render mixes
- Nails — buy them; don’t pay labour to straighten old ones
- Plastic sheeting — for curing a fresh pour, covering cement, masking off finishes
The masons won’t track any of this for you. They’ll flag a shortage only once they’ve run out — by which point the work has already stopped.
Know the limits
When I’d still bring in a professional
Self-managing is about controlling materials, money and momentum — not about overruling people who know more than you. There are decisions I wouldn’t make on my own judgement.
Anything structural or safety-critical is worth paying for advice on, even on a tight, self-managed build:
- Foundations and footings — especially on a slope or poor ground
- Roof and floor slabs, and any join between old and new concrete (lesson 2)
- Structural extensions — get a structural engineer’s view before tying in
- Drainage — getting water away from the building correctly
- Legal and land status — deeds, ejido land and the SRE process for foreigners
Managing the build yourself saved me real money, but it works because I knew where my judgement ran out. The point isn’t to do everything — it’s to be the person who decides, sources and checks, and to buy in expertise exactly where the risk is highest.
Questions
Common questions
Is it cheaper to manage your own house build in Mexico?
Yes — in my case, self-managing came out well below the MX$8,000–22,000/m² that many construction firms quote, because you’re not paying for their management and margin. But the saving isn’t free: it’s paid for with your time and attention. You become responsible for sourcing materials, checking quantities daily, deciding the finish standard and keeping people working. If you can’t be on site regularly, much of the saving disappears.
Should I hire a maestro de obra or manage the build myself?
A maestro de obra is an experienced lead builder who runs the day-to-day site and coordinates the masons for a fee — less than an architect, more than going it alone. Managing it yourself saves that fee but means you own the materials, timing and quality control. It comes down to how much of your own time you can give the site. If you can be there most days, self-managing is realistic; if you can’t, a maestro keeps the job moving without you.
What materials do I need to check on site every day?
Sand, gravel, cement, rebar and lime — and while you’re pouring reinforced columns and beams, also alambrón, alambre and nails. Walk the site each afternoon and order anything short by early afternoon, so it has the best chance of arriving before midday the next day. The masons won’t monitor stock for you; they’ll tell you once they’ve already run out.
What’s the biggest mistake when managing your own build?
Running out of materials. It’s the most common way a self-managed build loses days, and it leaves workers you’re paying standing idle. The fix is almost free — a daily stock check and ordering a day ahead. After that, the costliest avoidable mistakes are accepting a vague rendering standard, and not curing a fresh concrete slab properly in the sun.
Can I build a house in stages and extend it later in Mexico?
Yes — I built mine in two stages, and many homes here are built room by room as money allows. The key is to plan for it before the concrete goes in: ask the masons to leave rebar protruding from the beams where a future roof will join. Be aware that a join between old and new concrete tends to let water through, so detail it carefully (I run tiles over mine), and get a structural engineer’s view before tying new beams into existing columns.

Written by Luke Burchell
I managed the construction of my own house in San Cristóbal de las Casas, Chiapas — coordinating the masons, the materials, the water system and the finishing work myself, while living locally and working full time. These are the lessons I actually learned doing it, shared so you can skip the ones that cost me time and money.